The Many Faces of 3d Max Modelling ( Cad Plan to Max Modelling )
http://www.cgpinoy.org/t3696p60-3d-max-modelling-tips
The Many Faces of 3d Max Modelling ( Cad Plan to Max Modelling )
A. Through AEC Method.
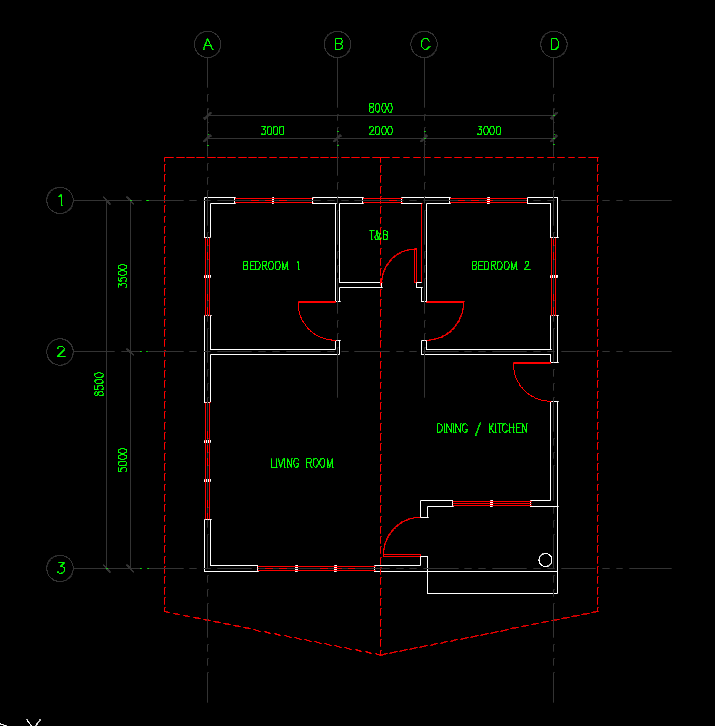
1. Here is my autocad plan for a simple house. This portion will focused on 3D Max AEC extended. For Autocad, i will bring that option on Autocad Software Thread.
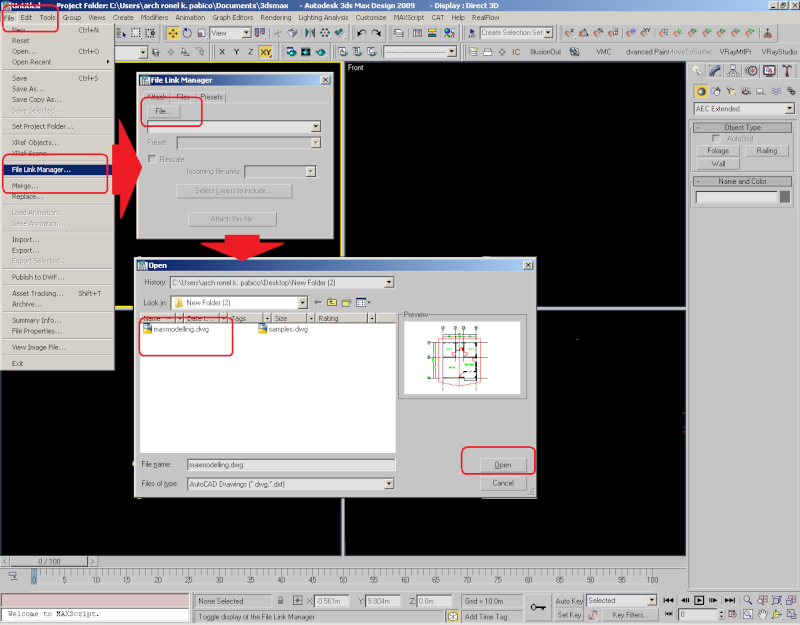
2. I would use File Link Manager so in the future, i can update it eventually when there are some plan revisions.
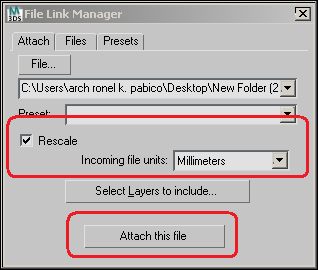
3. The autocad plan im using is in millimeter and my 3d max is in meter, in this case i will hit rescale.
4. And this is now the output.
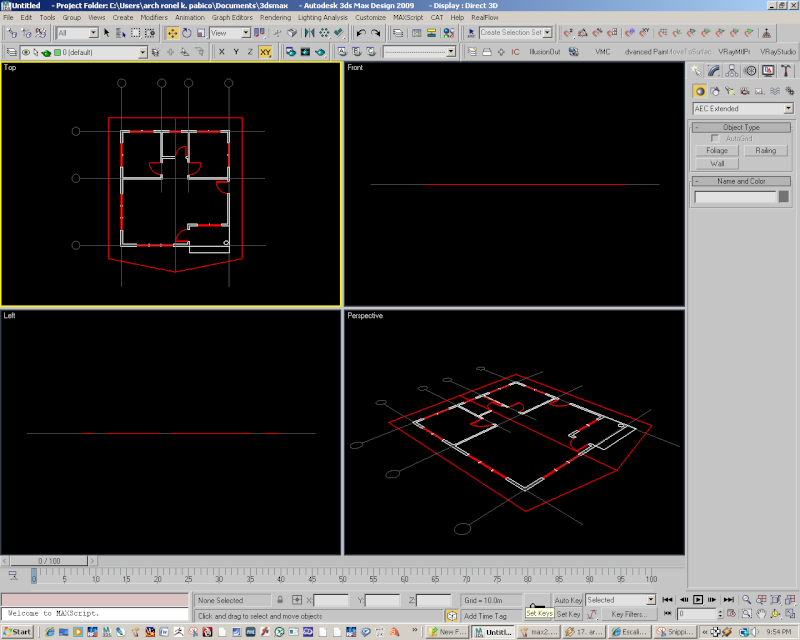
5. Since the plan is well layered from autocad, all layers will automatically be in 3dMax, and if i want to off some layer i will just turn it off on 3dmax layer dialog box. Although you can do on the file link procedure, you can choose which layer you want to use.
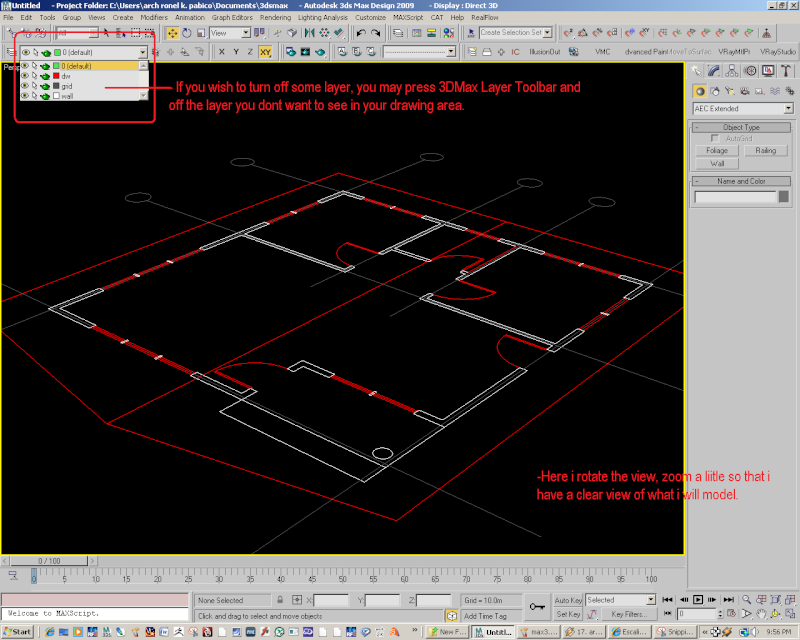
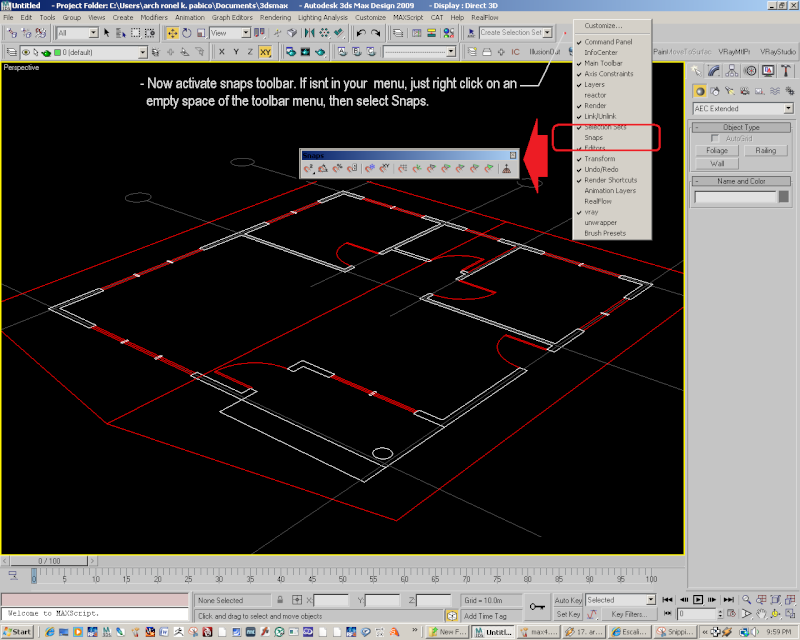
6. Now the preparation is almost complete, let us now set 3dMax on modelling. For a precise modelling, you need to use some important tools. Let us now use the snap. If the snaps toolbar is not yet activated on your menu see this image for procedures.
7. On using snaps tools, there are some things to remember.
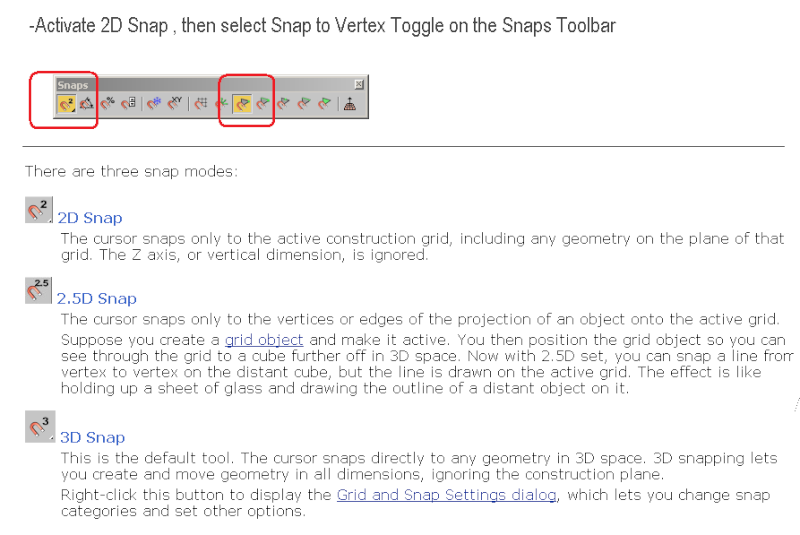
8. The next steps will explain further the usage of these snaps.
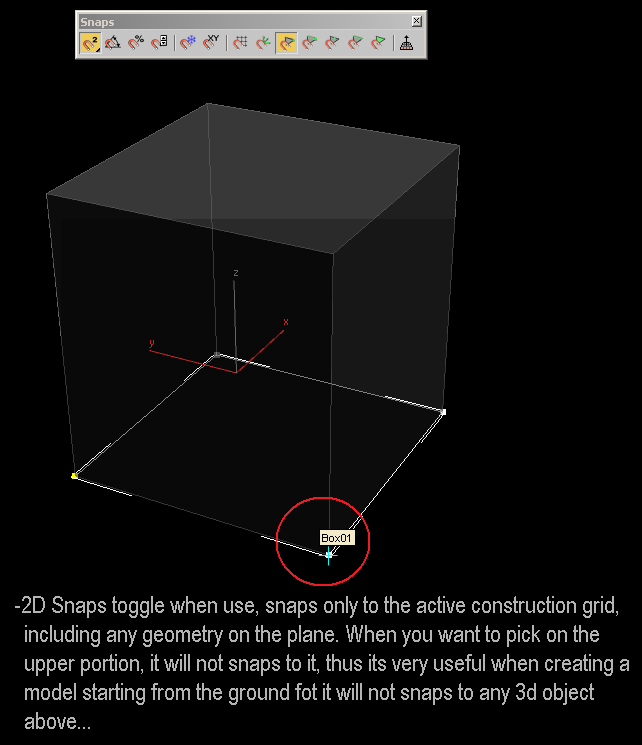
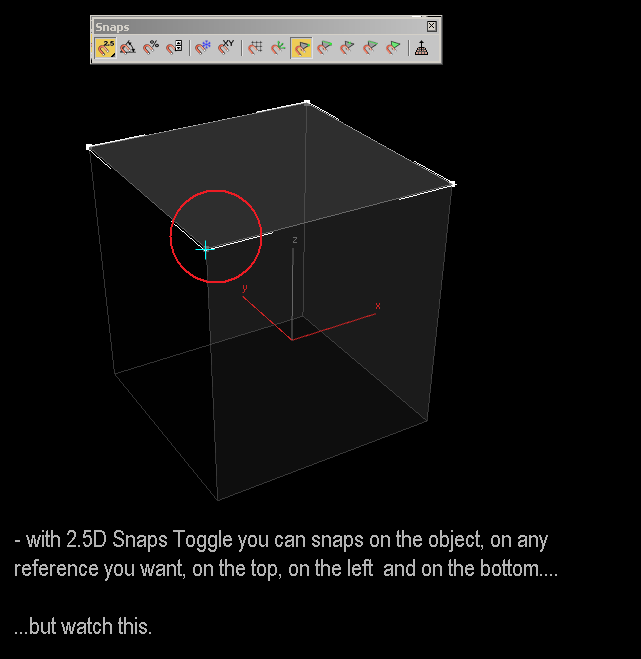
As you rotate the viewport, you will notice that the line you created was just lie on the grid 0,0 of the z axis.
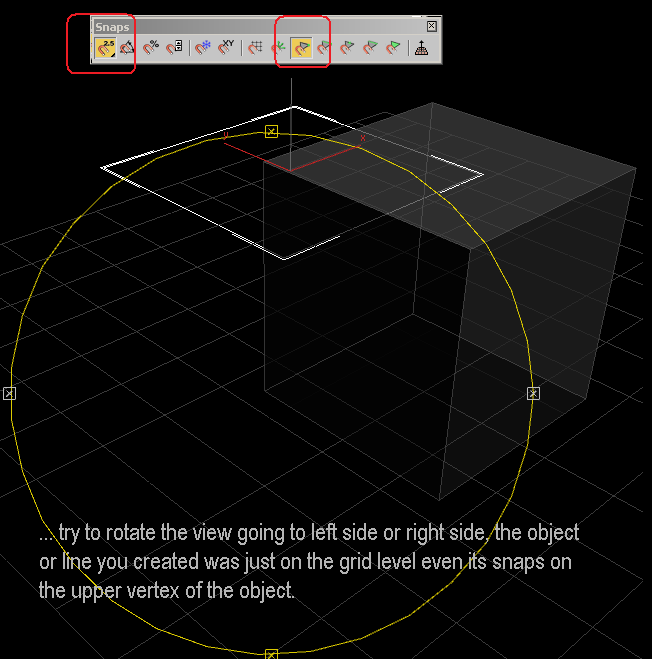
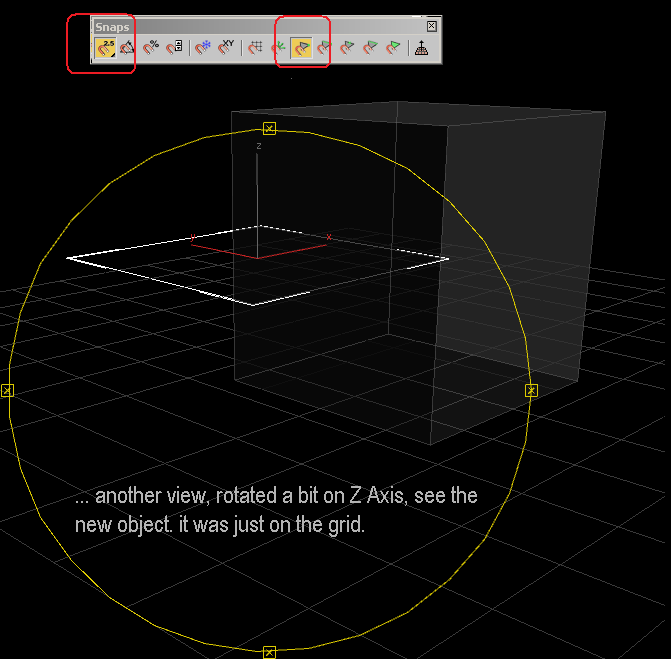
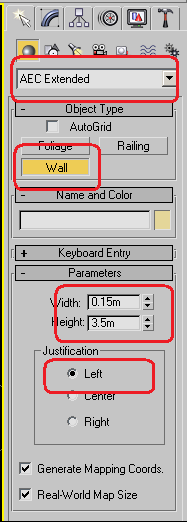
9. Now let us leave that matter for the meantime. Activate 2d Snaps toggle and the vertex toggle. On Creating Panel, choose AEC Extended and set the parameters accordingly.
10. Maximize perspective viewport.
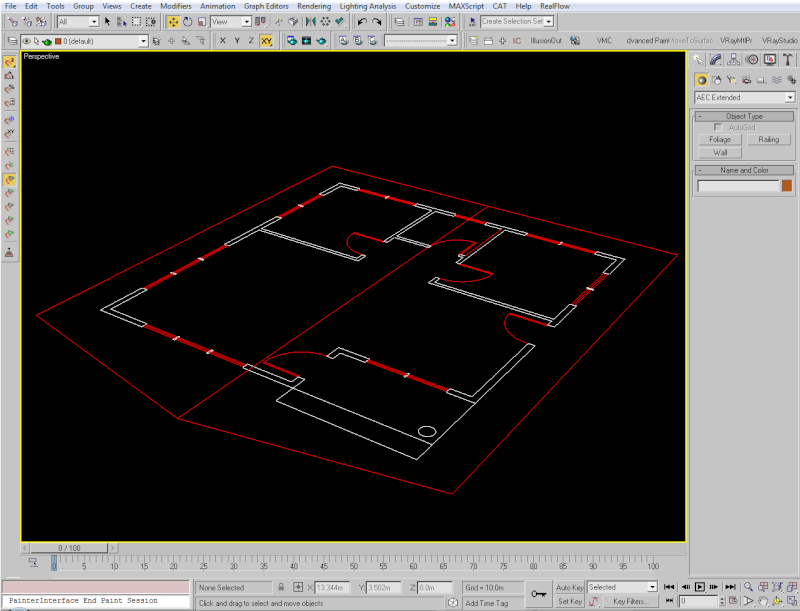
11. Then start creating your wall.
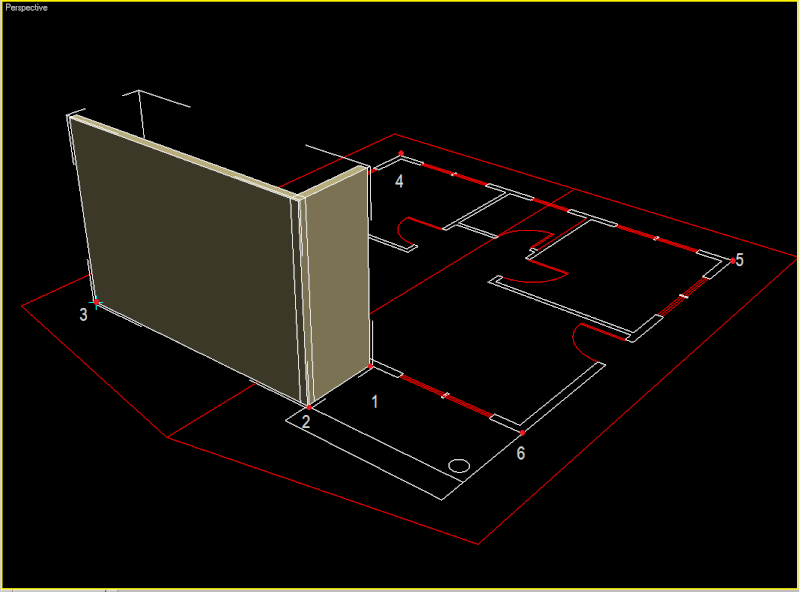
12. When you reached the last point accept yes to weld to weld points.
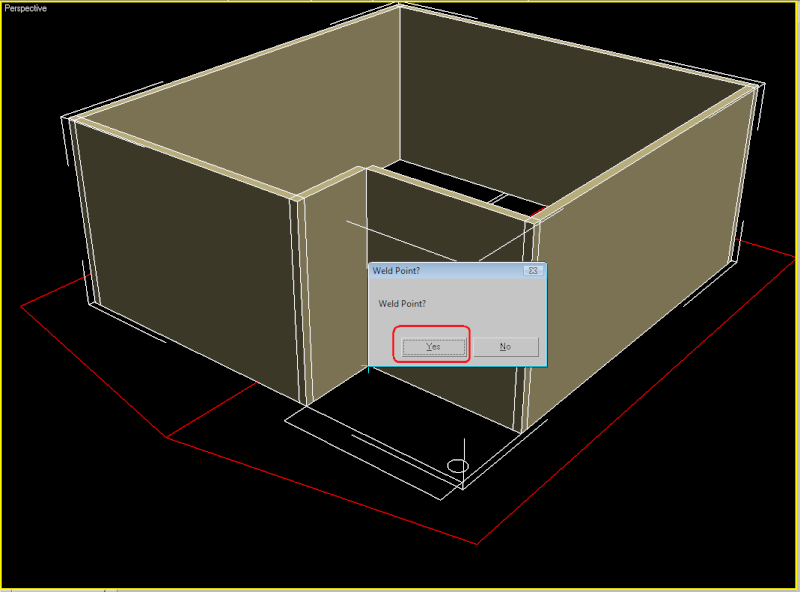
And now, you have a clean wall for your model.
... to be continued ....
A. Through AEC Method.
1. Here is my autocad plan for a simple house. This portion will focused on 3D Max AEC extended. For Autocad, i will bring that option on Autocad Software Thread.

2. I would use File Link Manager so in the future, i can update it eventually when there are some plan revisions.

3. The autocad plan im using is in millimeter and my 3d max is in meter, in this case i will hit rescale.

4. And this is now the output.

5. Since the plan is well layered from autocad, all layers will automatically be in 3dMax, and if i want to off some layer i will just turn it off on 3dmax layer dialog box. Although you can do on the file link procedure, you can choose which layer you want to use.

6. Now the preparation is almost complete, let us now set 3dMax on modelling. For a precise modelling, you need to use some important tools. Let us now use the snap. If the snaps toolbar is not yet activated on your menu see this image for procedures.

7. On using snaps tools, there are some things to remember.

8. The next steps will explain further the usage of these snaps.


As you rotate the viewport, you will notice that the line you created was just lie on the grid 0,0 of the z axis.


9. Now let us leave that matter for the meantime. Activate 2d Snaps toggle and the vertex toggle. On Creating Panel, choose AEC Extended and set the parameters accordingly.

10. Maximize perspective viewport.

11. Then start creating your wall.

12. When you reached the last point accept yes to weld to weld points.

And now, you have a clean wall for your model.
... to be continued ....
Last edited by render master on Tue Sep 15, 2009 7:56 pm; edited 1 time in total
_________________
http://renderworks.webs.com/

render master- Game Master

- Number of posts: 2893
Age: 91
Location: riyadh, saudi arabia
Registration date: 27/09/2008

 Re: 3d Max Modelling Tips
B. Doors and Windows ( AEC )
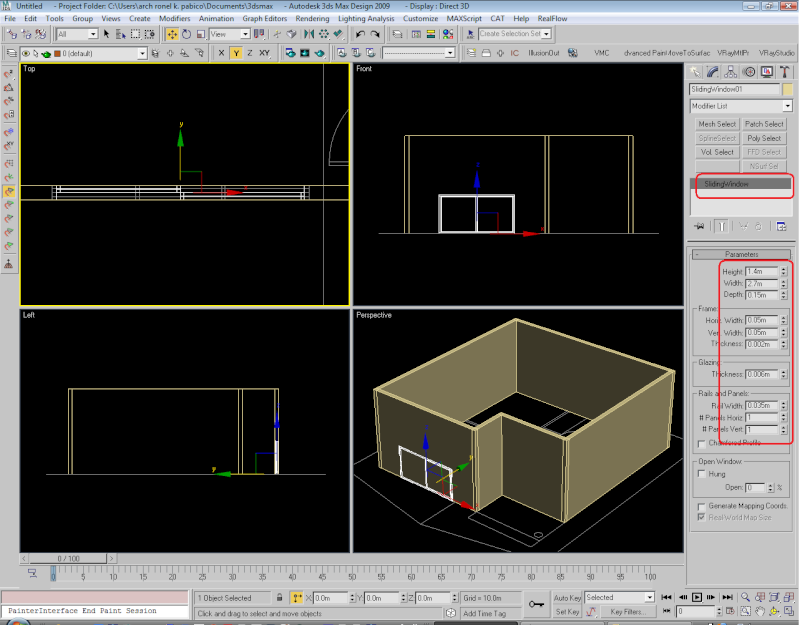
1. And now to create a Door and Windows - we will use the 3D Max AEC Components. Maximized Top viewport where you want to make your window. Activate AEC on Creating and Modifying panel and select Windows ( preferably Sliding Windows),
you may activate 2d Snaps plus vertex snap toggle,

Then drag to the window portion of the wall as seen on the plan. Dont worry about the preliminary sizes, you can adjust it later
 [img]
[img]
2. Then move it according to your preffered windows sill height.
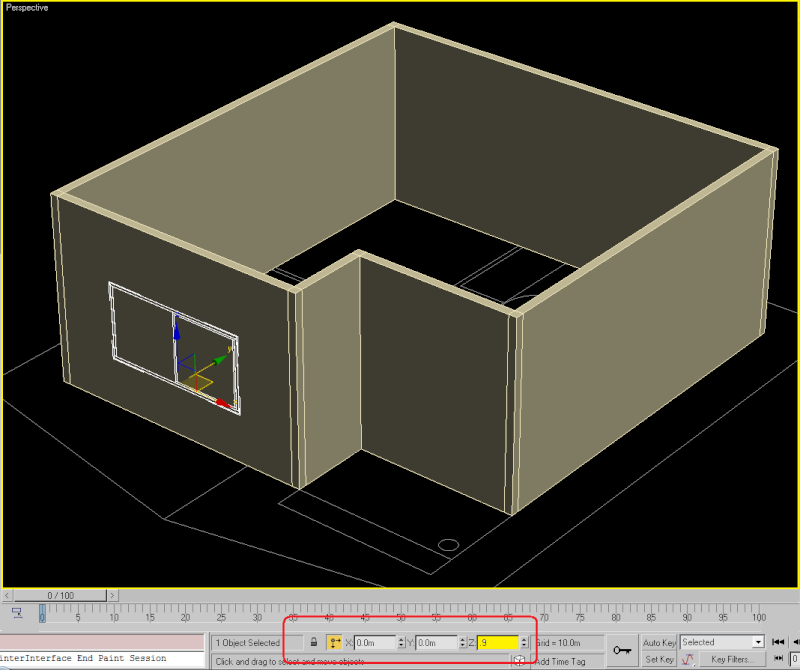
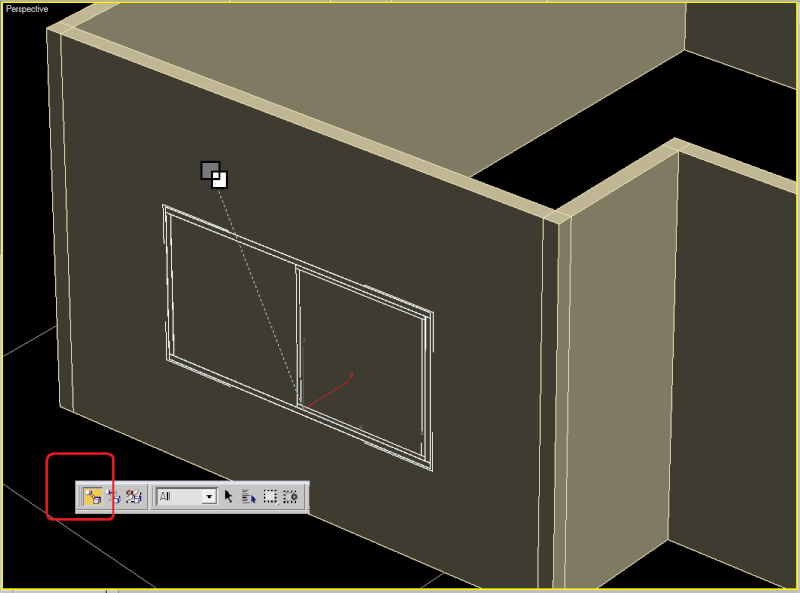
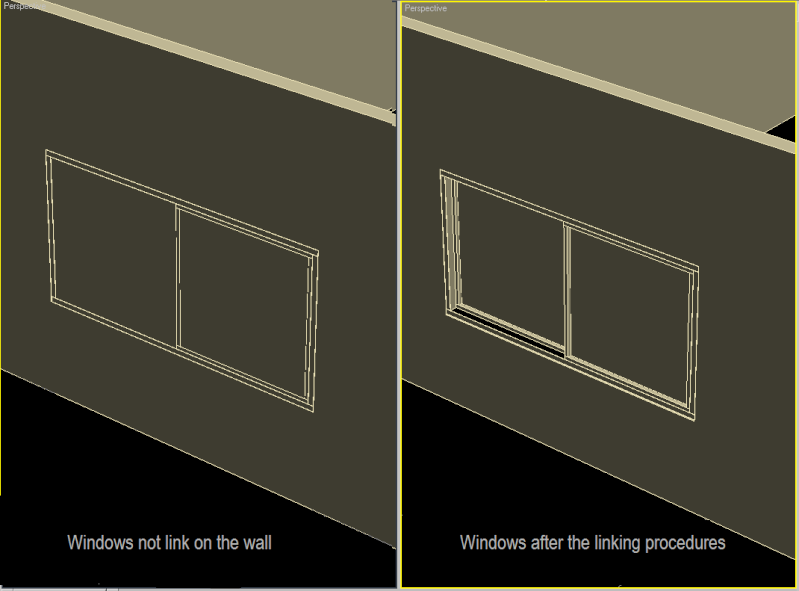
3. There some cases that AEC Components is not properly link to the wall, you will notice and see it when the window if properly positioned is partially not seen and was covered up by the wall. To avoid this, select your window, go to the main toolbar and press Select and Link Icon, the cursor icon will change as seen on the image. Drag now the windows to the AEC wall. The windows will now stick to the wall.
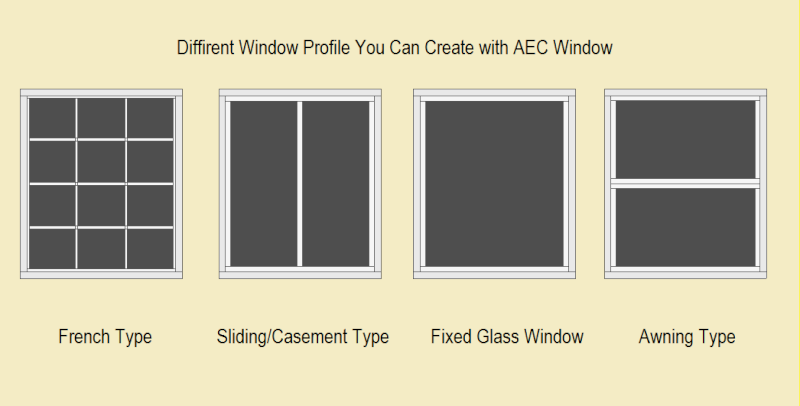
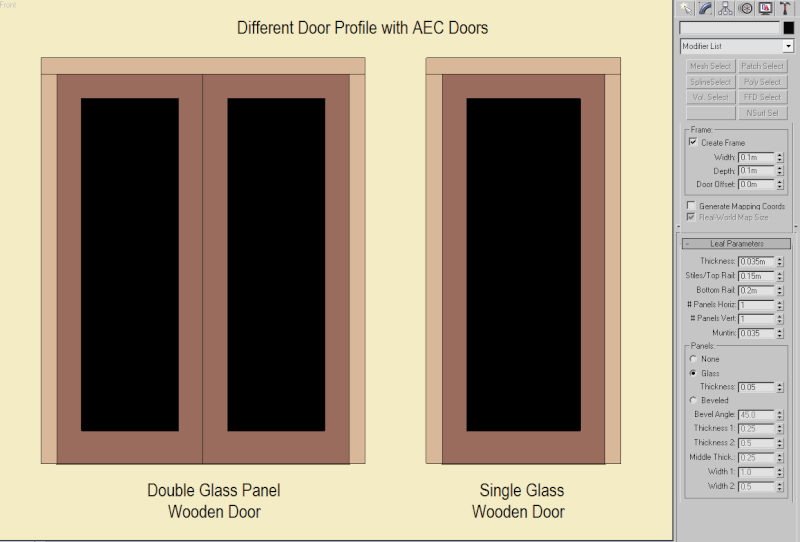
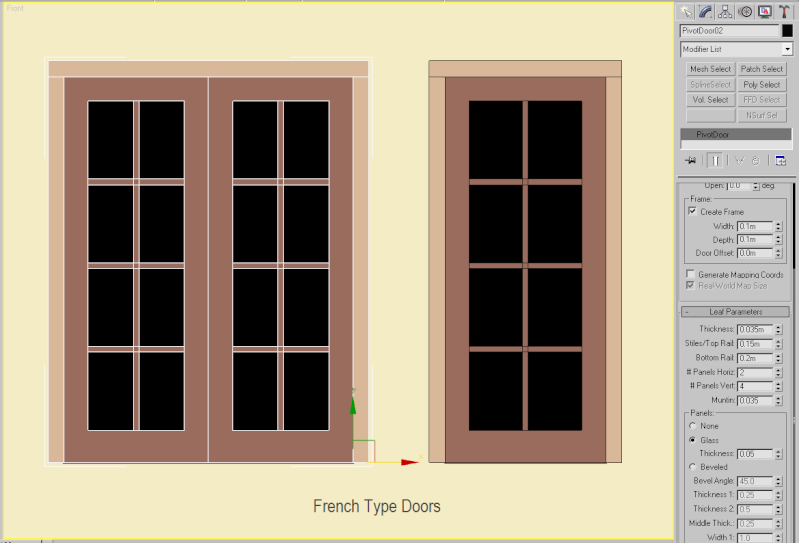
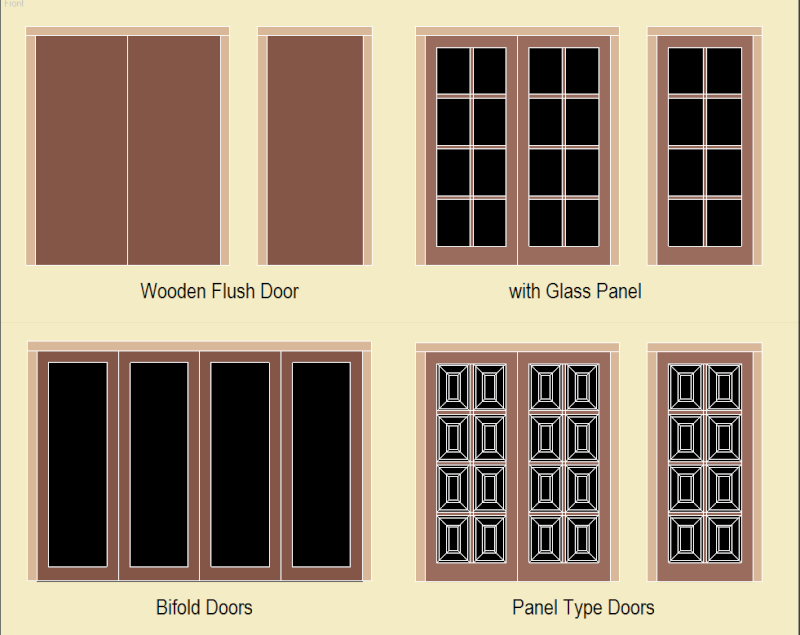
4. By exploring windows different profile, you can create different windows design out of it.
5. Do the same procedure for the door. but this time use Door AEC Component instead. Adjust to your prefered design
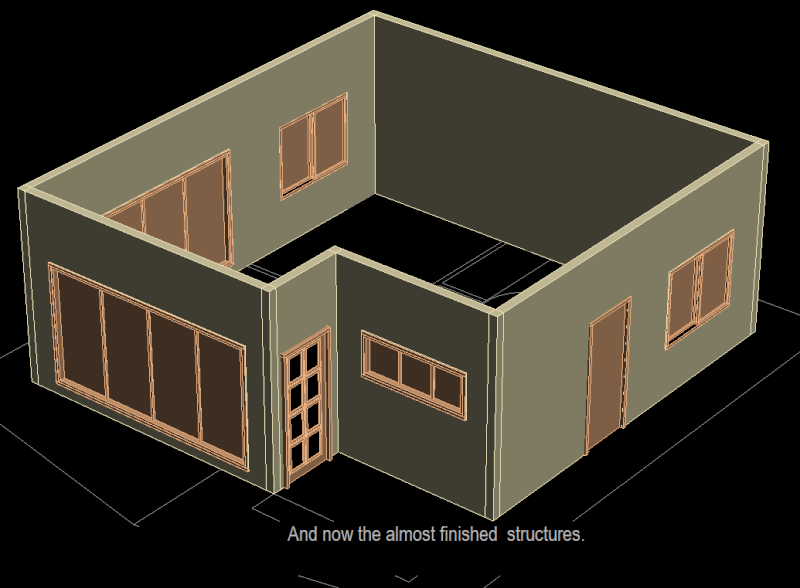
6. Complete all windows and doors as indicated on the plan
1. And now to create a Door and Windows - we will use the 3D Max AEC Components. Maximized Top viewport where you want to make your window. Activate AEC on Creating and Modifying panel and select Windows ( preferably Sliding Windows),
you may activate 2d Snaps plus vertex snap toggle,

Then drag to the window portion of the wall as seen on the plan. Dont worry about the preliminary sizes, you can adjust it later
 [img]
[img]2. Then move it according to your preffered windows sill height.

3. There some cases that AEC Components is not properly link to the wall, you will notice and see it when the window if properly positioned is partially not seen and was covered up by the wall. To avoid this, select your window, go to the main toolbar and press Select and Link Icon, the cursor icon will change as seen on the image. Drag now the windows to the AEC wall. The windows will now stick to the wall.


4. By exploring windows different profile, you can create different windows design out of it.

5. Do the same procedure for the door. but this time use Door AEC Component instead. Adjust to your prefered design


6. Complete all windows and doors as indicated on the plan

Last edited by render master on Tue Sep 15, 2009 7:54 pm; edited 1 time in total
_________________
http://renderworks.webs.com/
'Multimedia' 카테고리의 다른 글
| [CG Site] about CGlink (0) | 2012.08.13 |
|---|---|
| Autodesk 123D Catch & 123D Make (0) | 2012.08.03 |
| Yasutaka Furukawa (0) | 2012.07.25 |
| Grant Schindler (0) | 2012.06.20 |
| HUD란? (0) | 2012.06.13 |
| [Point Cloud] Photogrammetry - Laser Scanning (0) | 2012.06.07 |
| 오거 3D 엔진의 구조. - http://www.thisisgamelab.com/784 (0) | 2012.05.29 |
| dEngine: A iOS 3D renderer source code (0) | 2012.05.29 |
| Teaching the OGRE To Be Civil (0) | 2012.05.29 |
| Glrobal Earth Terrain Editor Toolbar (0) | 2012.05.08 |